A brief rundown of the hardware, software, and other accoutrements I use to facilitate teaching college-level courses from home, though this setup could be used in many lines of work.
My college will soon resume face-to-face instruction. I’m 50% vaccinated. How do I feel about either of those things? I don’t know. But the point is that even though teaching from home has been a big part of my life in the last year, I’m soon to be returning to the classroom. However, like a lot of colleges (community colleges in particular), I think my school will be keeping more elements than expected from this year of online only. At least, I hope they will. I’ll miss parts of online teaching–particularly, the ability to offer niche courses that actually make enrollment, since they’re accessible to every tech-equipped student in the HCCS area, as opposed to only those students with regular transit to my specific campus. Furthermore, despite the increase in vaccinations, the pandemic is not over, so I do not think the online-only classroom will be disappearing any time soon. To that end, I just wanted to share the system I’ve kludged together to work from home.
The Setup
Here’s a picture of my current set-up, with some “helpful” enumeration that I’ll use to discuss the components. I do want to say that, while I am describing my setup and the reasons I work with what I work with, I am not a tech expert and these descriptions should not be read as endorsements. If any of the hardware or software I write about causes problems for your devices, I take no responsibility. But I’ve been working with this set up for over a year, and am still going strong.

1) The desk
The desk caused a bit of a stir when I showed some of my colleagues at a recent online colloquium. It’s a folding desk. Open, it’s a nice, two-tiered desk with ample space for all my gadgets and gewgaws. I particularly like the shelf, for a secondary monitor, calendar, or whatever else I want in line of sight but not necessarily arm’s reach. I don’t have a cat, but imagine that it would be an ideal cat perch to keep them off of your keyboard. Now if you can only trick your cat into imagining that as well.
For months, I had been doing what most of us are probably doing: working with my laptop on my lap. But teaching four classes a day like this (plus office hours, planning, and grading) was wearing on me. Your standard laptop can run pretty hot when you factor in video conferencing software, your Learning Management Software, plus PowerPoint or any videos you may be sharing with your students. It quickly gets uncomfortable. Plus, putting your laptop on your lap places your camera at an unflattering angle.
“Look upon my nosehairs ye mighty and despair!”
I’d looked at several other models. Most of what I got when I searched for “folding desk” were little more than lapboards that you could set your computer on while sitting in bed. There were several others that were full-sized desks, but which required deal of folding and assembly–usually with a heavy desk-top as a separate piece that you would have to place atop the unfolded leg assembly. Not bad, but I needed something that I could transition in and out of pretty easily.
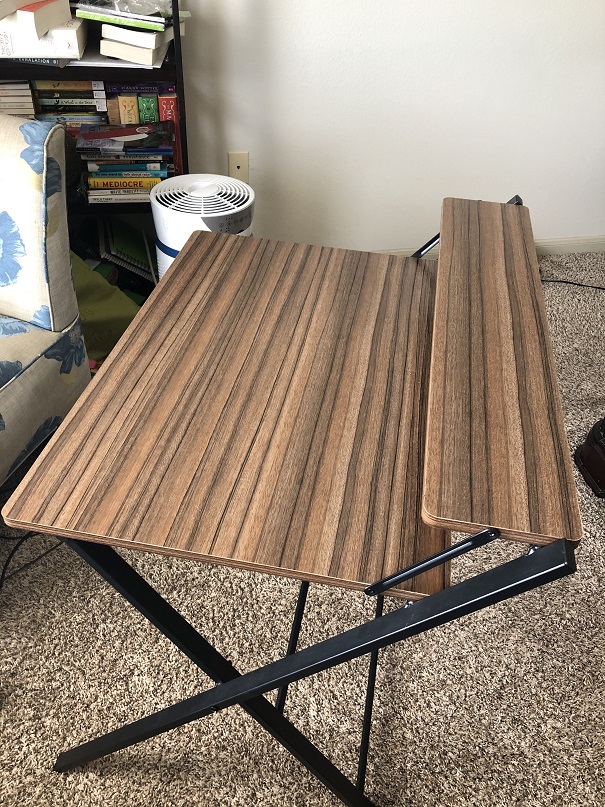
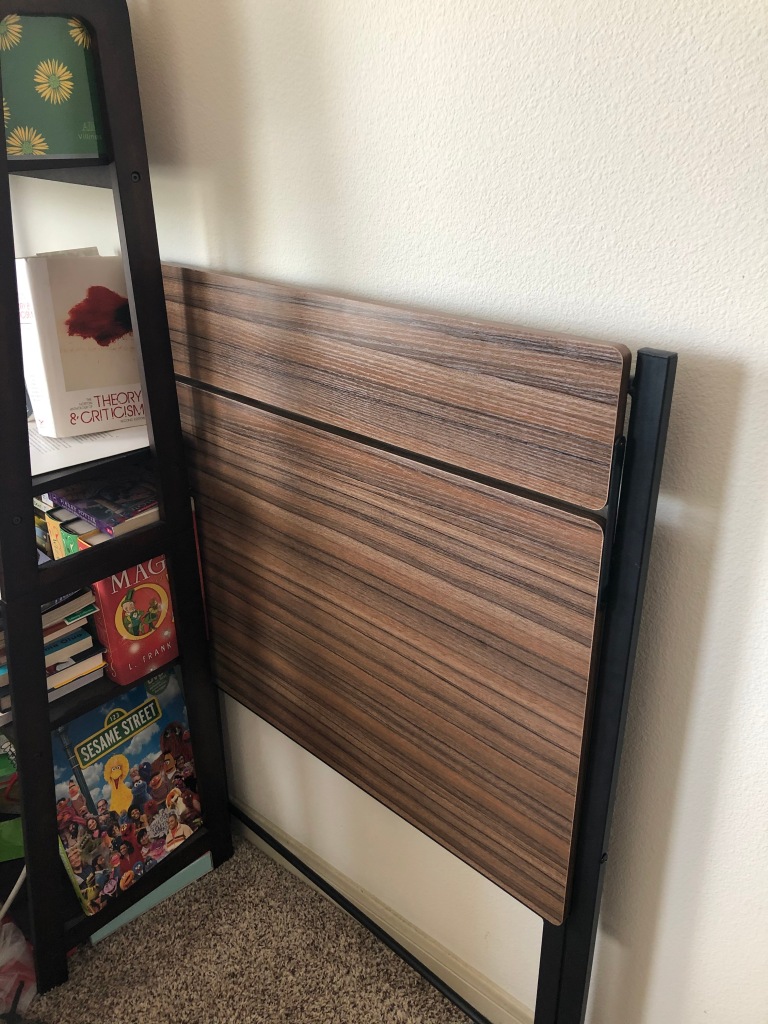
Here’s the model I ended up getting. Yes, that’s a link to Amazon. If I could find this in local retail, I’d snap it up in a minute. This is true with a lot of the devices that I’ve had to get to make things work. Anyway, as to the desk, it folds up flat enough for me to slide it behind one of my bookshelves. My wife calls it “my giant TV tray,” which is fair.
I’ve not had any problems with it, though there is one minor annoyance. The underside of the desk has one of those standard clip-bar-in-place dealios you’re used to seeing under… well, under TV trays.

If I push down hard enough to actually clip the cross bar in place, folding the desk back up becomes a much more time-consuming affair, so I usually just open the desk up but don’t clip it. But hey, if the complaint for this collapsible desk is “dadgummit, it’s just too secure,” then that’s a manageable grievance in my book.
2) The second monitor
My second monitor is an iPad. I didn’t buy an iPad just for this; I’ve had this one for five or six years. But once I started teaching live courses online, I soon saw the need for a second monitor: When I teach with PowerPoint, I could only see my PowerPoint slides. Actually, once I brought up my Webex chat window and my student cameras,* I couldn’t even see a lot of that. So I have set up my iPad as a second monitor. This is the screen that I share with students. This leaves my primary screen as a place where I can have my notes, chat, and faces. Plus, if I ever need to check out grades or something during class, I don’t have to turn off screen share, because any sensitive info is only on the screen they’re not seeing.
*(I encourage my students to have their cameras on because it makes the experience more collegial and increases the sense of connection and community. I do not require them to have their cameras on, because that is invasive.)
If I didn’t have this tablet, I would probably have ordered a second monitor. My college has been very generous about helping faculty have the tools they needed to teach, and I could have ordered a small monitor through them. But I did have the iPad. If my tablet were another brand, I probably could have converted it to a second monitor more easily than I have done. Unfortunately, though, it’s an Apple product, which means it has been built around the philosophy of making it impossible to use as I actually want to use it (while being told that I like it this way). But, as the saying goes, there’s an app for that.
2a) Duet
The screen-sharing app that I’m using is called Duet. There are many screen-sharing apps out there, but this one is mine. I installed it on the iPad and also on my computer, and now all I need to do is plug the iPad into my computer with a standard USB cord,* fire up the app on the iPad, and after a minute of digital thinking, I have a second screen.
*(Here, “standard” means “a normal, functional USB cord on one end, with the ridiculous proprietary Apple-only end on the other.”)
It cost about $10 when I bought it, but that’s a one-time fee. There is a subscription tier, which lets you connect your iPad to the computer wirelessly, and also lets you use draw directly on the iPad for art applications. But I didn’t need either of those functions.
I have had a slight problem wherein sometimes the Duet app won’t recognize that it’s plugged into my computer. In those cases, I’ve learned the easiest thing is to close Duet from the system tray of the computer, and then re-open the computer version of Duet. That’s worked every time.
Another problem is, for whatever reason, the iPad stops drawing power from the computer when it’s in monitor mode, so make sure your iPad has a good charge on it before you start with the marathon use.
3) Water bottle
Stay hydrated, y’all!
4) Pencil Box
Also known as my “presentation box,” my “go box,” or–when I’m feeling salty, “the box of dongles.” I first started using this to move quickly between the various classrooms I taught in, keeping track of my pens, pencils, PowerPoint remote–and, most especially, my dry-erase markers. (My preciousssesss.) It’s also pretty helpful for academic conferences. That’s why I have dongles in it for devices I don’t even have–it’s nice to be a superhero for the young academic who can’t make their computer talk to the hotel’s projection system.
In the present arrangement, it’s a bit more banal in its functionality. Pens and pencils, mostly. But it’s also got a nice psychological effect: When I finish teaching, I shut my supplies away in there, and I’m done for the day. It’s very easy, when working from home, to erode the already tenuous divisors that allow you to be free when not at work. Small rituals like closing my pens up in the box and giving myself permission to be done for the day are important things.
5) Syllabus folder
Some of the most needful and useful accommodations I’ve made have been low-tech. One of these is I have a simple folder here where I keep all my course schedules. They are always in reach. Sometimes, I forget what I’m planning to do in a class just after I’ve finished building a lengthy PowerPoint for that class. We’re all carrying a lot of stress right now, so anything you can do to reduce the small drains on your bandwidth can really help you from falling apart.
6) Wacom tablet
My school got a whole passel of these devices for classrooms, back when we were working towards a Flex campus modality (half of the students are in class, the other half are “playing along at home”). This handy tablet makes up for the lack of a subscription for Duet, giving me stylus functionality on my computer. In the usual classroom set-up, I write on the board a lot (hence my fierce protectiveness of my dry-erase markers). This is something I can’t do, of course in the digital classroom. So, I use this tablet.
I’ll fire up MSPaint (yep, that old gem!) and use that as my whiteboard (after dragging its window to my shared screen, of course). I’m playing around with some other apps to use as a whiteboard–particularly something that would let me have multiple open pages I could flip around to, and even export as a PDF that I can make available to my students (not that that’s probably super essential–given just how random some of my annotations seem without the context of the lecture). In any event, MSPaint is serving perfectly well for my purposes right now. I’ve also used it to annotated .docxs of student writing in workshop scenarios, and to measure the scansion of poems in some open PDFs.
This particular Wacom tablet (Intuos) has four configurable buttons. Out of the box, these are set up as the function keys: Ctrl, Shift, Alt, and the Windows key. I don’t find this particularly helpful, so I’ve swapped a couple of them out. One of them automatically fires up MSPaint. The other is a toggle that will cycle through my screen displays. By default, the surface area of the Wacom tablet is paired to all your screens’ area. Roughly, it looks a little something like this if you’ve got things set up with one screen on top of the other, as I do:

If you’re only using the Wacom stylus as a mouse, this isn’t a problem. But it can lead to some distortion if you’re trying to draw or to write legibly. So that’s why I think it’s a good idea to set up the screen toggle: If I click once, it will only put the stylus on my main monitor. The second click puts it on my second monitor (the sharing screen). A third cycles it back to both monitors.
Another thing to bear in mind if you start using one of these things: at first I treated my stylus like a mouse, which I had to untrain myself from. Think about what happens when you drag a mouse to the edge of your mousepad. What do you do? You probably pick up the mouse and relocate it. The cursor stays where you left it, but the mouse is now more conveniently located. That’s not how the Wacom stylus works. It will always read the position of the cursor as relative to they stylus’s position on the tablet. So you have to get away from the instinct to move the stylus to the center when you’re coming close to the edge–the only way to bring the cursor to the edge is to let the stylus go that far.
7) Microphone
Teaching online means having a microphone. Now, the laptop has an internal mic, but I like having a wand mic, because I can sit a little further from the computer and still be heard. Also, when I type, the vibration from my clicking doesn’t travel to the mic and reach my students. Some of my colleagues have plunked down for some nice podcasting mics, or have ordered them through the school. For my purposes, this little mic is enough.
I actually had this pre-pandemic, because I will often record my commentary on student papers instead of writing everything out.
Here’s the one I’m currently using:

You’ll see I put a little piece of tape over the gain nob so I don’t accidentally mute myself. Also, here’s a link to the one I have set up on the other computer, the one my wife teaches her voice lessons from, and she doesn’t have any complaints (I just asked her!) The mic wasn’t particularly expensive (or at least they weren’t when I got them. I picked up the Insignia years ago, and I don’t think I paid $40 bucks for it–I was a grad student!). But they’re both perfectly functional little USB mics, which I’ve not had any problem out of.
7a) Recording software
This isn’t a post about my grading process–though I’ve been working on one off and on. However, if you’re intrigued by recommendation of recording the commentary on your student papers, one brief piece of advice I want to give you is to have separate recording software. It doesn’t have to be anything fancy, but you mainly don’t want to be dependent on the browser-based applet that is probably bundled into your LMS. My school uses Canvas, which mostly is pretty good. But if there’s some kind of hiccup, either with the server or with my browser, when I’m trying to submit an audio comment I’ve just recorded… then more often than not I’ll lose the recording. That means having to start over from the beginning, remembering everything I just told that student.
That’s why I strongly advise you use something third-party. If you’re using a Windows machine, you already have Voice Recorder. That’s fine, but I don’t like it. You don’t have control of what file type you can export, and you can’t go back and edit. I’m a stutterer, and sometimes when I glitch out I need to trim out a lot of dead air. (Or maybe I realize I’m not taking the tone I want. Or maybe a problem I had in paragraph 2 is resolved in paragraph 3.) When I need to, it’s good to be able to cut out a few target sentences, rather than have to upload something warts and all. If you have an Adobe subscription, you can use Audition for this. If not, Audacity is a fine generic substitute. I’m sure readers will be very quick to offer alternatives in the comments. Or they would, if I had readers.
Now that I’m using a third-party recorder, if I have a snafu with the uploading process, it’s not a total loss. Oh, the mp3 didn’t load? That’s okay, I still have the mp3; I can try again! Whereas if I were dependent on the in-browser recording function, if it fails to load I usually lose everything in the recording.
8) Computer glasses
I do not currently have a prescription for eyeglasses, though I probably need one. I use these glasses for two reasons: One, they create the illusion of eyebrows. Two, these are some of those trendy “computer glasses” which purport to block out blue light, thus reducing eye strain and fatigue. It’s fully possible that this is hokum, and that the effect is entirely psychosomatic. Oh well. The first test of anything should be if it works, and placebo or not, I have fewer migraines and less eye fatigue when I wear these. Plus, taking these off when I’m done computering is another nice “done for the day” ritual.
I got these at Target. I also got my wife a pair. Once upon a time these were arcane implements found only among the enlightened. Now, they’re pretty much everywhere. You can find a style you like and that fits your head pretty easily. I do advise you also get a microfiber cloth if your glasses don’t come with them. I don’t know what it is, but these mammajammas smudge pretty easily–more so than actual glasses.
9) The computer
This is a Dell Latitude 5400. When I graduated with my PhD I swore that I was done with laptops and that I would never buy another one. And I still haven’t. This one was issued to me by my school. We’ve got a more robust desktop, but my wife uses it to teach music lessons. The superior processing, the musical software, and the various hardware are more needful to her work than to mine. For the first few weeks of the pandemic, when I was teaching asynchronous courses, we were “hot-desking.” She would teach her scheduled classes, and then whenever she was done, I would hop on and work on my class website.
That sucked. It meant that we were never both done working. It also really crimped my flexibility for meeting up with students. But, as I’ve said, my school has been very good to me in this time. Really, the specifics of the laptop itself aren’t all that important right now. I mainly just wanted to have a few subheadings about some of the software that I’ve been using in my work.
9a) Webex
“Zoom” has lately become a proprietary eponym–a brand-specific term that has somehow come to stand for the generic. Band-Aid, Kool-Aid, or Mega-Maid are all similar examples.

We all knew that eventually there would be some eponym for video conferencing, and it amuses me that it was Zoom–which I honestly had never heard of before the pandemic. I guess Skype never really got the broad cultural recognition it needed, and FaceTime, though generic-sounding enough, was probably doomed to dwindle (linguistically) in the fiercely protected walled garden of Apple’s terminology.
Anyway, I don’t use Zoom. My school supports Webex, Microsoft Teams, BigBlueButton, and Kaltura. I’ve played around with most of these in my various classes to see what was most reliable–not just in terms of what consistently worked, but which had an interface that my students could get a handle on. Since most of my students only have a phone for a computer, I also wanted something with a decent app–since smartphone browsers don’t always play nicely with video or PDFs.
I use Webex, though I know some of my colleagues choose differently. I like it because it’s already incorporated into my LMS. It’s got some good features, but it doesn’t require a lot of technical know-how. The phone app is a little limited, but still functional.* On the computer, I can share screens, chat with my students, and even do on-screen annotations. Admittedly, the internal whiteboard software is a little clunky–hence why I use MSPaint. Later generations have also incorporated Breakout sessions, which is really handy for peer review or other group discussion projects. Previously, this function was only available in the slightly different “Trainings” interface, which is much more technical.
*(Whenever I teach, I use the computer version. But whenever I attend a college function, not as a presenter, I like to use the mobile app. I think it’s important that you reproduce the student experience as often as you can, so you’re better equipped to talk them through the problems they’re having.)
One of the things I’ll be sad to see the back of should we return entirely to physical classes is the chat function. Sometimes, students just don’t want to speak up in class, but they still want to contribute. Chat has been good for that. It also lets a student “whisper” an answer or a comment to me, so they can contribute without making themselves vulnerable. In that case, I’ll say something like “I’m seeing in the chat…” and I can address the comment or question without outing the student. (I don’t always succeed in this. Sometimes I don’t notice that the message was to me privately until I’ve blurted already. Webex should use different font colors or highlighting to differentiate between public and private marks, to reduce the instance of those sorts of problems.
9b) A clipboard manager
I no longer use Turnitin, but there are some features I miss about it. One of the big ones is the QuickNotes feature that lets you save your more common emendations for ready use on future papers. So instead of writing out the same note about a missing thesis statement each time, I could isntead have a common note about thesis. I could have a note that was two or three paragraphs long, so that the note automatically explained itself. If I typed “thesis” into a menu bar, it would bring up that note. Click, click, done.
But as I no longer use Turnitin, and as Canvas has still not implemented a similar function in SpeedGrader I’ve made do with a clipboard manager.
Ordinarily, you can store one thing in your clipboard. When you copy something, it replaces that one slot. But with a clipboard manager, you can keep multiple things in your cue. I’ll often have a little grading form that I put in the comments of every paper I read (“This is your draft score. This other number is what this would score if you submitted it as the final. Etc.”) But if I need to copy and paste a link into my browser when I’m checking out a student’s source, I can do so with zero reluctance, knowing that I can just open the menu on my clipboard manager and roll back to the common note I wanted to make.
I also have a word document where I store a lot of my longer notes, and when I see that there are three or four notes that I’m having to make on every other submission for this assignment, I can copy those into my clipboard to have them on speed-dial.*
*(Also, when I see that I have to make the same note a dozen times in one submission cycle, this usually tells me that this is something I need to address in class or teach differently. This often affects my pedagogy in future cycles, and has been one of the main factors I consider when I redesign my courses from semester to semester. Although sometimes I worry that I’ve Ship of Theseus’d myself so thoroughly that I’m no longer comprehensible on certain topics because I’m too busy anticipating likely problems.)
The manager I’m currently using is CLCL. It’s perfectly functional, and free. If there’s one you’ve found that you prefer for any reason, I’d like to know about it.
Tales from the Comments (4/4/2021)
So commenter bp brought up something interesting in the, erm, comments. They called my attention to Windows 10’s built-in clipboard manager. Apparently if you hit Windows + V, you can access your most recent clipboard additions. I will admit that I was not aware of this, because I am not an expert–just someone who’s kludged some stuff together and is sharing his results. So when I was grading yesterday, I played around with Win+V instead of CLCL.
I gotta say, I’m glad they have this function. And for users who are reluctant to install random third-party software (I get it), it’s a serviceable little doodad. But I’m not wild about it. Yes, it saves the last few clips, but how many? I couldn’t find any numbers (not that I looked very hard). Also, there’s not a lot of customization. You can turn it on and off, and you can turn web-syncing on and off, that that’s pretty much all you get in the settings menu.
To summon it, you have to hit Win+V, which summons a new window. That window doesn’t have a presence on your bar though, so if you click on something else, dismissing it as the active window, you have effectively closed it out. That made it relatively tough to get a screenshot. You can’t set it so there’s a dedicated system tray icon, which you can with some third-party managers. I like having the clipboard always at hand, and being able to switch my current loadout on the fly, as opposed to having to summon a new window every time.
Also, let’s take a look at the interface. Here’s what a Win+V window looks like:

Now, from a design standpoint, this is fine. It’s nice and clean. It’s not very busy. But it also doesn’t give me a lot of options. It only shows my two latest clips. I have to scroll for more. I cannot resize the window to something with a little more real estate. That means the interaction process to get an older clip is
- Keyboard command
- Scroll to find the clip I want
- Scrolling is an additional action, yes, but also factor in the frustration of hunting
- Although the preview windows are big, depending on what you’ve clipped, you may not see everything in the preview. If you’ve got several clips that are slight variations of things that start the same way (which is common for paper emendations and student form letters), then you don’t know by looking if this is the one you want. Hovering your mouse over the window to see the full version does nothing.
- You can “pin” a clip that you want to keep in your history. That just means it doesn’t get deleted, though. You still have to hunt for it. Your pinned clips don’t stay at the top of your list, and there is no buttonclick that will switch you automatically to your pinned clips
- Click on the clip I want
- It will be pasted to the position of your typing cursor if it’s in an active program.
- Also, this is now your active clipboard, so if you hit Ctrl+V or use the right-click/paste option, this is automatically what comes up. This is pretty standard for clipboard managers.
I find the above tedious. I particularly don’t like switching interface modalities: keyboard/scroll wheel/mouse. In contrast, here’s what CLCL looks like:

It’s nowhere near as pretty, I’ll give it that. And it may have too much tiny text for some users, but that is based on your Windows preferences for menu fonts + the CLCL configurations for how many clips you want to keep available.
You’ll see there’s an options menu there at the bottom. This is pretty well customizable.
Sure, it has the same problem as Win+V in that you only have the first few characters to look at. But here, if you hover over a menu item, as you can see, you’ll get a tooltip with the full text. The process is a bit more direct:
- Click the CLCL icon in the system tray
- Click the clip you want
- With the default settings, it’s all on one screen. So though it’s a long menu, it’s all visible at once with no scrolling.
- Hovering reveals info
- There’s also a viewer in the menu if you want to look at your clips outside of the tooltips. You can also use the viewer to reorder your clips, or to type something directly into your clipboard.
Without the frustration of hunting or interface shifting, I much prefer this interaction. Fewer clicks needed, and you can do it all with the mouse. I believe there are keyboard commands you can set up in the menus, but I’ve never had call to use them, nor have I missed them.
So thanks again, bp, for putting that on my RADAR. I was really hoping Win+V would allow me to uninstall CLCL (not because I hate it, but because I don’t want anything installed I’m not using), but it looks like I still prefer the third-party system here.
Now back to our regularly scheduled program.
9c) Dual
I discussed this in the section about monitors, above.
9d) MSPaint
I discussed this in the section about the Wacom tablet.
9e) PowerPoint
If you’ve reached this stage of your professional development, whatever profession that is, and you don’t know about PowerPoint, then you can probably continue to have a long and happy life without it.
10) A legal pad
Yep, a simple legal pad. Again, some of the most important accommodations I have made have been low-tech. For me, there is no replacement for the immediacy of handwritten notes. Whether I’m jotting down some good points that students bring up in discussion, or whether I’m making a list of what I need to get done (and thus, giving myself permission to stop thinking about it), having a simple legal pad at hand is incredibly helpful. If I tell a student I’m going to circle back on a question, or that I’m going to make a particular resource available, I need to write that down because I know that otherwise I’ll instantly forget.
Yes, there are note-taking apps that use keyboards, a stylus, or even voice notes. But I’m already juggling enough tech–I don’t need to add another needless complication. Also, I used to tell my students (several years ago) that they shouldn’t take notes on a phone, because it will always look like they’re texting. I don’t say that anymore, because most of my students have a phone as their primary or sole computer. But it’s still true for me. If a student makes a really good point about a text that I want to take note of, I don’t want them thinking–or even flirting with the thought–that I’m checked out and don’t value their contribution.
Well, that’s all I have to say on this, presently. I hope others find this useful, particularly among my colleagues in education. If you have any questions or suggestions, feel free to mention it in the comments. I may update this post from time to time as I notice other components of my setup that I can’t live without, but which somehow have become so natural to me that I don’t even notice them anymore.

Great article, Jeff, even to a reader outside the realm of academia.
Also, Windows 10 actually has its own clipboard manager that you can access with Windows key + V. I’ve not used CLCL, so I can’t compare the two, but I’ve found the Microsoft implementation very handy in my work.
LikeLiked by 1 person
Hey, bp, thanks for bringing that to my attention. I’ve played around with it a little, but didn’t care for it. I added some text about that in the relevant section. –JRV
LikeLike